
Introduction
Vercel’s Next.js has come a long way since its initial release in 2016. What would become the most popular React framework (according to their own website, at least), started as a simple solution for handling routing, SEO optimisation and server-side-rendering within React applications; all of which were lacking in React at the time.
Fast forward several years, and Next has grown into an incredibly performant, well-supported and fast-developing framework, with millions of users worldwide.
When Next 13 was released however, Vercel signaled a new direction with the inclusion of the App Directory (in beta). In the time since, they have developed this feature further, turning it into the App Router, which has since stabilized along with some other features discussed in this article.
Some Next developers have felt caught between the potentially-soon-to-deprecated approaches they know and love, and the new approaches they were being asked to adopt, many of which require them to apply new mental models, structure their code differently, and rethink how they build Next.js applications.
What’s the issue?
Next’s App router has had some developers scratching their heads, so we thought we’d take a closer look at the differences between this new approach, and the old one. We’ll identify some of the pain points you’ll stumble across as you migrate, and get you up and running, ready to build, with Next 14’s App Router.
Feel free to check out the GitHub repository that accompanies this article, as we’ll reference it throughout.
Getting Started
If you’re using the example repository, simply run:

Application Structure
On a basic level, the App Router requires us to structure and mentally-visualize our projects in ways different to the Pages Router. Many of us have, for years, stored our pages inside of a pages directory. Adjusting to the way the App Router asks us to structure our Next application, and the new naming conventions it brings with it, can be difficult, but is surprisingly simple.
In essence, the app directory wraps around our routes, and allows us to better organise pages, routes, and more, within it.
Let's take a look at the Pages Router and the App Router side by side, to better see the differences in how they are structured:

It might look confusing at first, but the App Router simply opts for file-system approach to routing. Each folder defines a route, with the layout.tsx in the ‘leaf’ folder generally being the entry point for the user in viewing the page, the page.tsx being rendered in the children props of layout.tsx.
The App Router allows you to create static routes, as well as dynamic or parallel routes, or intercept routes, and while we won’t go into them here, the basic principle of routes being wrapped in folders still applies.
Layouts
Sometimes, you don’t realize something is broken until somebody shows you a way to fix it. Layouts in Next are, arguably, one of those things. The Pages Router offered a fairly simple layout system that seemed to work well for most situations, however, it did have its drawbacks.
Firstly, layouts were often located in a place within the application that always seemed a little unnatural (stored in a ‘layouts’ directory, very much separate to the ‘pages’ directory). Secondly, nesting layouts was complicated, verbose and difficult to follow.
By contrast, with the App Router, layouts can be nested with ease. In the example below, you’ll see the top-level layout.tsx will affect all pages, whereas the layout.tsx inside of the ‘about’ route only adds a nested layout to this, specific to the ‘about’ route.
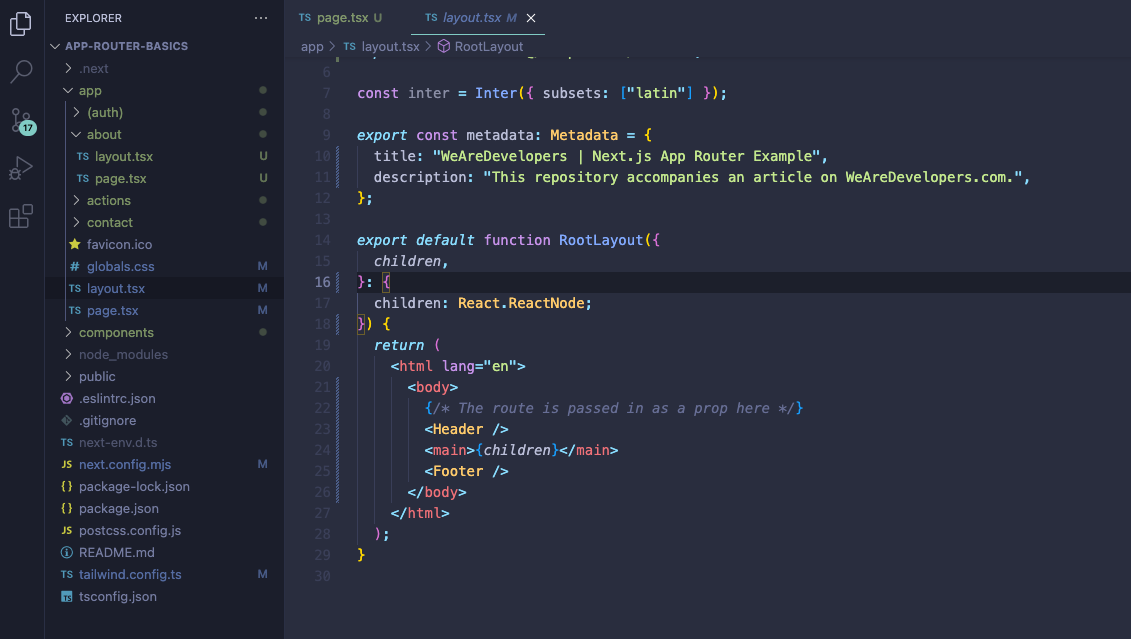
One huge benefit to this new approach is that it’s so easy to create a group of routes and apply the layout to each of them, without affecting the URL on the frontend. To do this, simply create a new folder, and enclose the title in parentheses. In our example repository, you see this in action, where the (auth) group is created to easily apply a common layout to each of the pages in the group.
This file structure makes projects far easier to navigate, and to visualize, in terms of which layout applies to which route.
Admittedly, this new approach might not be as easy for a Next newbie to learn, but it’ll most likely make Next applications better-organized in future.
Server and Client Components
The App Router brought with it a fundamental shift in how we think about the server and the client in Next.js.
In the Pages Router, all components were rendered on the client by default, with exceptions being made when we used server-side functions like getServerSideProps, getStaticProps and getInitialProps.
In the App router, however, components are server-side rendered (SSR) by default, with client-side rendering (CSR) reserved for components that require interactivity, such as a clickable button or an input field.
This means that the vast majority of your code will now be rendered on the server, with holes where your select CSR components will be placed when the UI is rendered on the client.
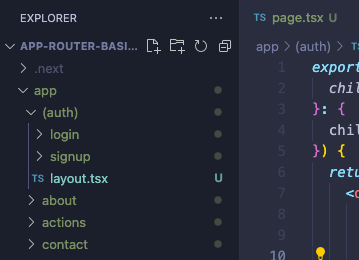
So, how do we know the difference? Well, if we know that the server-side option is the default, then we declare client components as such, using the “use client” directive at the beginning of the file containing one of our client components.
As our ‘UpdateButton’ is an interactive element, we’ve made it a client component using “use client”, in the example below:
It’s important to know though, when a component is declared to be a client component, its children are automatically declared to be client components, too.
Data Fetching
Data fetching should have been so simple in the Pages router, but often ended up being so unnecessarily complex and untidy. So many applications would start out clean in their approach, and over time grow into a mixture of server-side functions and useEffect hooks added to avoid the dreaded hydration issues that have haunted us all at one time or another.
The App router approach does require some re-learning, but certainly simplifies this process.
Using the model discussed above - rendering the majority of our code on the server first, with data flowing down into select, interactive client components - we can now simply fetch our data in the parent (server) component, then either render it directly in the server component itself, or pass it down to the child (server or client) components as props.
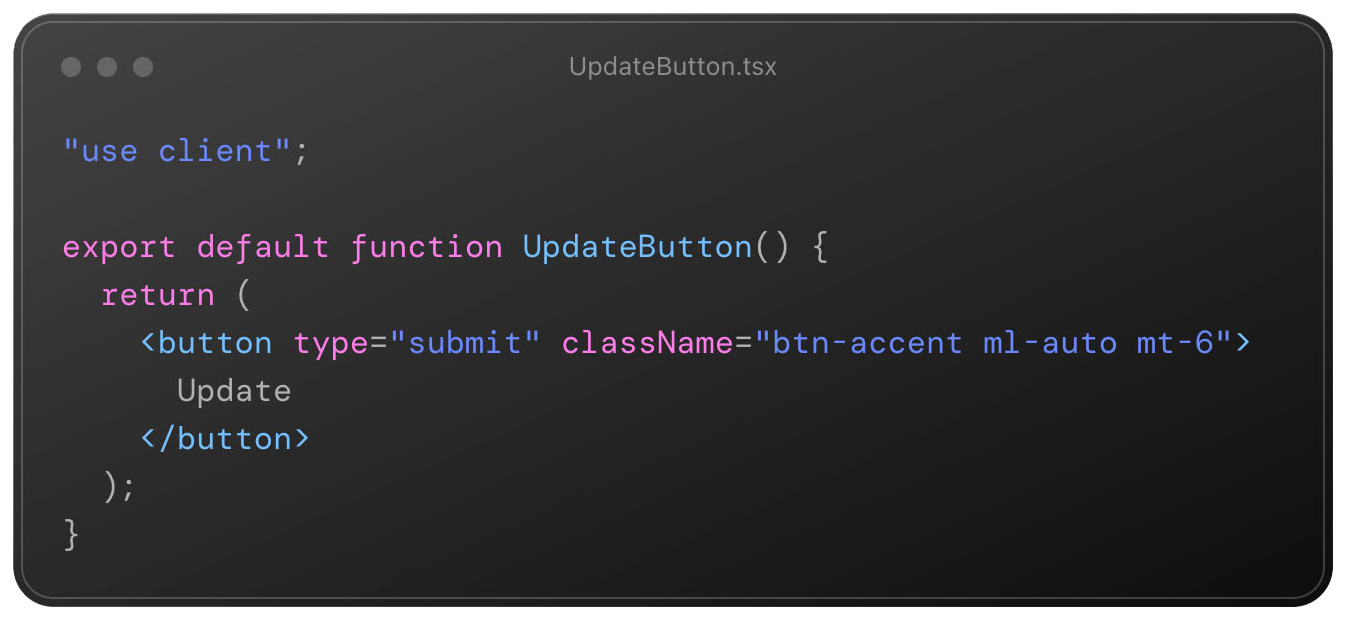
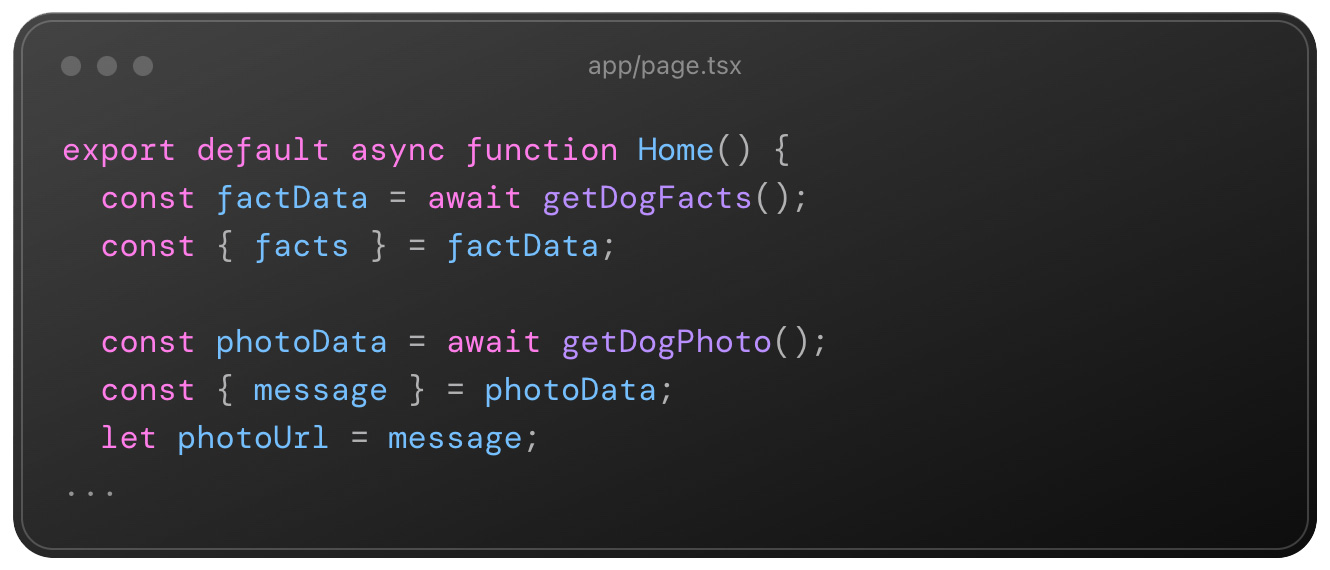
We begin our data fetching in the server component, app/page.tsx, with the getDogFacts() function. Next.js extends the native fetch API, and has a whole load of options we can attach to our request, but for now we’ll keep it straight-forward:
In this example, this fetch request collects five dog facts from a public API, and returns the serialized data as JSON.
Notice that we’re not using get getServerSideProps or anything else that we would have reached for using the Pages Router, instead, we’re simply making our requests in the server function itself. Simple.
Now let's do the same again, but with a different endpoint (as we want to return a photo this time), along with a simple options object after the URL:

Now that our fetch requests are in place, let's store the data returned by them both in variables we can use throughout our application. For getDogFacts() will return an array, which we'll de-structure to facts for readability. The getDogPhoto() function, however, will return a string-based URL that we will store in photoUrl.
Aside from how easy this makes it for us to see where data is being fetched (ie on the server or the client), this approach results in just a small amount of code being rendered on the client (in this case, only the UpdateButton component), compared to how it would have been using the Page router, where practically all of our code would have been rendered on the client unless we (rather awkwardly) specified otherwise.
Okay, so far, so simple. We’ve structured our project in the way that the App Router expects, and gotten to grips with the differences between server and client components. Next, let’s take a look at one change that App Router has brought that has had developers tying themselves in knots over... server actions!
Server Actions
When submitting data from a form using the Pages router, we could typically reach for an onSubmit function and attach it to our <form> element, right? Well, not anymore.
The App Router includes server-side, asynchronous functions called Server Actions that give us a modular and contained way of handling form submissions, and data mutation.
While server actions can be used in-line within a server component, we’ll show you how to keep your code tidy by creating a modular function, importing it, then attaching it to our form element.
First of all, in a folder named ‘actions’, we created our function, named update. While it might not do much right now because we’re not passing any values from input fields, the function is set up for us to pass any kind of data to our database, or - in our case - simply force the index route (“/”) to revalidate:
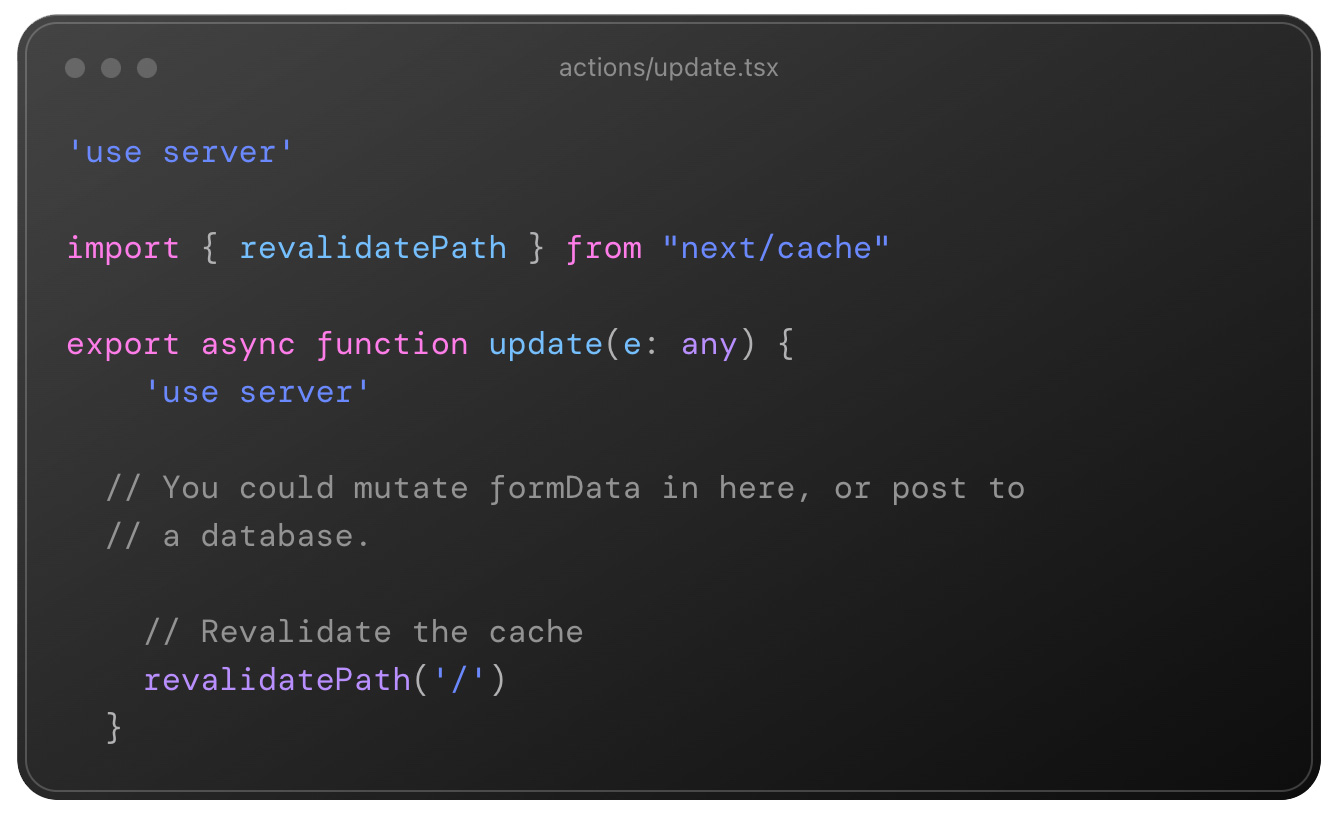
With this setup, our function will fire, server-side, when our form is submitted. We use the “use server” directive to make sure our function is recognised as a server-side function, then attach it to our form element using the ‘action’ prop, to turn it into a server action.
After clicking the ‘send’ button and firing your server action, you will notice the console.log fires in the terminal, rather than the client. Of course this is exactly what we want to happen, but it can be confusing at first, nonetheless.
But wait… you have fired your server action, and can see that it works, but you do not see a change in the data displayed on the page. Why not?
The answer is actually surprisingly simple, and one that I’ll get to in the next section.
Caching and Revalidating Data
One of the more tricky aspects of migrating to the App Router is the way data is cached and revalidated. By default, Next will cache data, meaning updates to this data will not show on the UI, even if the user refreshes the page.
In terms of performance, this is great; It means we don’t make unnecessary API calls when data is already in the cache, but can be tricky to adjust to.
To prove how this works, we included the following option object in our getDogPhoto() function:

By including this option object, our photo data will never be stored in the cache, and therefore a request will be made on every single page load. Not great, for performance, but useful if we need the most up-to-date data by default.
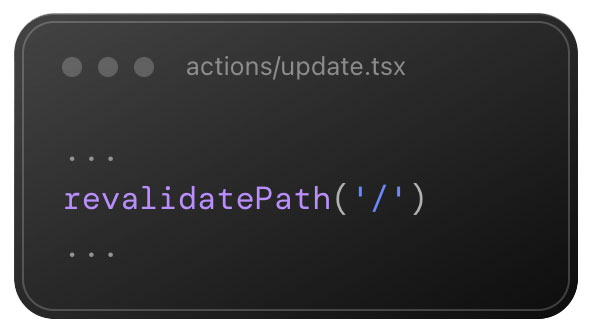
By contrast, our getDogFacts() data is stored in the cache (as we have not stored an options object). In this case, our data will persist, even on refresh, meaning the only way for the user to get it to update is to force revalidation via our server action:
Of course, there is far more to caching and revalidation, particularly when it comes to using dynamic routes. However, this example hopes to give you a good idea of the mental model to adopt for this kind of router.
Performance
Okay, here’s the kicker. In its present form, some reports show the App Router performs worse than the Page Router. Sure, the new model will undoubtedly result in fewer calls (see caching), which in turn should result in a reduction in the monthly bills of some of Vercel’s larger clients, but the slower performance of the App Router just serves to show that it’s not in its final form yet, and still has plenty of room for improvement.
Of course this isn’t ideal in the short-term, but is likely to be improved with subsequent versions.
Migrating to the App Router
Vercel have a fantastic migration guide in their docs, which can help if you’re on an older version of Next.js in an existing project. In there you’ll find an in-depth explanation for a number of the migration issues mentioned here, as well as some of the other features we’ve not touched upon here.
Not feeling ready to make the switch? No worries, because - for now, at least - Next supports using both, at once, to help with incremental adoption.
Want to take a look, and see if it’s for you? Feel free to fork the example project and use it to experiment with the App Router for yourself.
Conclusion
Shifting from the Page Router to the App Router takes some getting used to, and this article is certainly not an exhaustive list of the differences between the two. However, once you adapt to the new mental models and subtle differences in syntax, using the App router really isn’t as difficult as it looks, and… just makes a lot of sense.
Good luck, and let us know your thoughts on Next’s App Router on socials or via email.


What’s a Rich Text element?
The rich text element allows you to create and format headings, paragraphs, blockquotes, images, and video all in one place instead of having to add and format them individually. Just double-click and easily create content.
Static and dynamic content editing
A rich text element can be used with static or dynamic content. For static content, just drop it into any page and begin editing. For dynamic content, add a rich text field to any collection and then connect a rich text element to that field in the settings panel. Voila!
How to customize formatting for each rich text
Headings, paragraphs, blockquotes, figures, images, and figure captions can all be styled after a class is added to the rich text element using the "When inside of" nested selector system.